The profound connection between humanity and the cosmos becomes remarkably vivid when experienced beneath an unpolluted night sky. Far from urban light pollution, camping in remote locations offers an unparalleled opportunity to witness celestial phenomena that have captivated civilisations for millennia. Modern stargazers can now access pristine dark sky locations across the United Kingdom, where the Milky Way stretches visibly from horizon to horizon and meteor showers illuminate the darkness with spectacular displays. These astronomical camping experiences combine the primal satisfaction of outdoor living with the intellectual wonder of cosmic observation, creating memories that resonate long after returning to civilisation.
The increasing awareness of light pollution’s impact on both astronomical observation and ecological systems has led to the designation of numerous Dark Sky Parks and Reserves throughout Britain. These protected areas maintain natural darkness levels that allow both amateur astronomers and casual observers to experience the night sky as previous generations once knew it. Professional-grade stargazing no longer requires expensive observatory visits when equipped with proper knowledge and portable equipment in these designated locations.
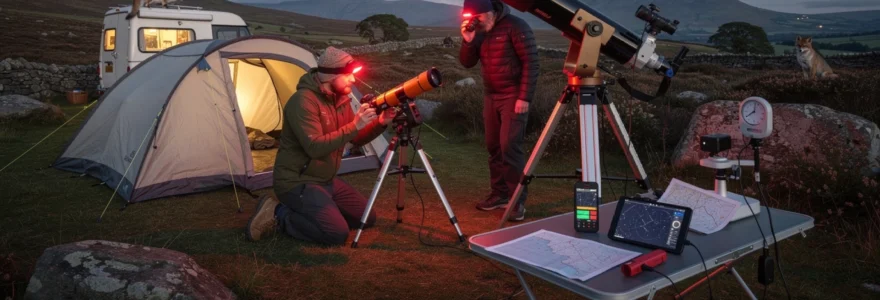
Essential astronomical equipment for optimal stargazing experiences
Successful astronomical camping expeditions depend heavily on carefully selected equipment that balances portability with observational capability. The weight constraints of backpacking and the power limitations of remote locations demand strategic choices in telescope selection, imaging equipment, and support accessories. Modern technology has revolutionised portable astronomy gear, making sophisticated observations possible even in the most remote camping locations.
Celestron NexStar and orion SkyQuest telescope specifications
The Celestron NexStar series represents the gold standard for portable computerised telescopes suitable for astronomical camping. The NexStar 4SE model, weighing just 9.5 kilograms with its mount, provides exceptional versatility with its 102mm aperture and automated GoTo functionality. This Schmidt-Cassegrain design offers a compact optical tube that packs efficiently whilst delivering crisp planetary details and deep-sky object visibility. The telescope’s database contains over 40,000 celestial objects, automatically slewing to selected targets with remarkable precision.
Orion’s SkyQuest series offers excellent value for campers prioritising aperture over computerisation. The SkyQuest XT8 Dobsonian, with its 203mm aperture, gathers significantly more light than smaller telescopes, revealing faint nebulae and distant galaxies invisible to lesser instruments. Despite weighing 18 kilograms, the telescope disassembles into manageable components for transport. The simple altitude-azimuth mount requires no power source, making it ideal for extended camping expeditions where battery conservation remains paramount.
Red light headlamps and dark adaptation techniques
Preserving night vision represents a critical aspect of successful stargazing that many novice campers overlook. The human eye requires approximately 30 minutes to achieve full dark adaptation, during which rhodopsin accumulates in retinal cells, dramatically improving sensitivity to faint light sources. A single exposure to white light instantly destroys this adaptation, necessitating another half-hour recovery period. Red light headlamps preserve night vision because rhodopsin remains largely insensitive to wavelengths above 630 nanometres.
Quality astronomical headlamps feature multiple red LED brightness levels, allowing users to adjust illumination based on specific tasks. Reading star charts requires minimal illumination, whilst equipment setup demands brighter settings. The Petzl Actik Core offers excellent red light functionality with rechargeable battery capability, essential for multi-night camping expeditions. Professional astronomers often employ red cellophane filters over standard torches as backup solutions, though dedicated red light sources provide superior performance and convenience.
Star chart applications: SkySafari pro and stellarium configuration
Digital star charts have transformed astronomical navigation, providing real-time sky maps that adjust automatically for location, date, and time. SkySafari Pro stands out amongst mobile applications, offering comprehensive databases exceeding 25 million stars, nebulae, and galaxies. The application’s night vision mode displays charts in red tones, preserving dark adaptation whilst providing detailed celestial information. Advanced features include telescope control capabilities, allowing direct slewing to selected objects when paired with compatible mounts.
Stellarium
Stellarium, available for desktop and mobile platforms, delivers a planetarium-grade simulation of the night sky that is particularly valuable when planning camping under the stars. Users can pre‑configure observing sites corresponding to specific dark sky campsites, import custom horizon profiles, and enable plugins such as satellite tracking or ocular simulation to match their telescope and eyepiece combinations. When you are miles from the nearest town, this level of planning helps you anticipate exactly when the Milky Way will arch overhead or when the Andromeda Galaxy clears a nearby ridgeline. Activating night mode and reducing screen brightness to the lowest practical level helps preserve dark adaptation while still benefiting from Stellarium’s detailed visualisations.
For optimal use in remote environments, you should download offline star catalogues and deep‑sky object databases before leaving home, reducing the need for mobile data in marginal coverage areas. Creating observing “scripts” or target lists within SkySafari Pro or Stellarium allows you to structure your night, moving systematically from bright showcase objects to more challenging targets as your eyes adapt. Think of these applications as the equivalent of a pilot’s flight plan: they do not replace the experience of flying under the stars, but they ensure your observing session runs smoothly and efficiently.
Tripod stabilisation systems for astrophotography
Whether you are shooting wide‑field Milky Way panoramas or high‑magnification lunar close‑ups, tripod stability is the foundation of successful astrophotography in camping environments. Lightweight travel tripods often struggle to cope with uneven ground, gusty winds, and the added weight of star trackers or telephoto lenses. A robust aluminium or carbon‑fibre tripod with a payload rating at least double your camera and lens combination dramatically reduces vibration and image blur. In practical terms, a setup weighing 2 kilograms benefits from a tripod rated to 5 kilograms or more, especially when operating in exposed moorland or coastal headlands.
Advanced stargazers frequently pair their tripod with an equatorial star tracker such as the Sky‑Watcher Star Adventurer or iOptron SkyGuider Pro. These compact mounts compensate for Earth’s rotation, allowing exposures lasting several minutes without star trailing when properly polar aligned. To enhance stability further, you can hang a weighted dry bag or rucksack from the tripod’s centre column, use spiked feet on soft ground, and avoid extending the thinnest leg sections unless absolutely necessary. Treat the tripod like the foundation of a building: if it is secure and well‑anchored, every layer of optical and imaging equipment above it performs to its full potential.
Prime dark sky locations across the united kingdom
The United Kingdom offers a surprising abundance of dark sky destinations despite its relatively high population density. Designated Dark Sky Parks, Reserves, and Discovery Sites provide some of the best places for camping under the stars, with carefully managed lighting and public outreach programmes. These areas combine low light pollution with outstanding natural scenery, transforming a simple camping trip into an immersive astronomical retreat. As you plan your next escape, it is worth considering not only the darkness of the sky, but also access, facilities, and seasonal weather patterns at each location.
When choosing where to camp, you will encounter formal designations such as International Dark Sky Reserve or Gold‑Tier Dark Sky Park. These labels are awarded by organisations like the International Dark‑Sky Association (IDA) and indicate sites that meet strict criteria for sky quality, lighting controls, and public education. For the astronomical camper, such designations act like a quality seal: they reassure you that your efforts to travel into the countryside will be rewarded with truly spectacular night skies.
Snowdonia national park’s designated dark sky reserve
Snowdonia National Park in North Wales became an International Dark Sky Reserve in 2015, recognising its outstanding night sky quality across more than 2,000 square kilometres of rugged mountains and valleys. On moonless nights, the Milky Way is often visible as a bright, textured band cutting across the sky, and observers regularly report naked‑eye views of the Andromeda Galaxy and the Double Cluster in Perseus. Popular camping areas such as the valleys around Llanberis, the shores of Llyn Gwynant, and the more remote Rhinogydd hills offer convenient access to both trails and dark horizons. For stargazers, this combination of alpine‑style terrain and minimal light pollution is hard to beat.
From a practical perspective, Snowdonia’s varied topography allows you to tailor your observing site to specific targets. Wide southern horizons from lakeside camps are ideal for tracking the galactic centre in summer, while elevated passes like Pen‑y‑Pass provide sweeping 360‑degree views that are perfect for meteor showers. However, the same mountains that create stunning silhouettes also generate fast‑changing weather and orographic clouds, so flexibility is essential. Packing waterproof layers, checking short‑range forecasts, and having a fallback lower‑altitude campsite in mind will greatly increase your chances of a successful stargazing session.
Northumberland international dark sky park camping zones
Northumberland International Dark Sky Park, encompassing Northumberland National Park and Kielder Water & Forest Park, is one of Europe’s largest protected dark sky areas. Its Gold‑Tier status reflects skies that are typically Bortle Class 2–3, meaning the Milky Way casts a perceptible glow and zodiacal light can be visible along the ecliptic. For camping under the stars, designated sites around Kielder Water, Bellingham, and the Coquet Valley offer a balance of accessibility and darkness. Many campsites actively support astronomical visitors, with late‑night access, minimal on‑site lighting, and in some cases, organised stargazing events.
One of the great advantages of Northumberland for astronomical camping is its relative remoteness from large conurbations. With Newcastle and Edinburgh both over an hour away by car, skyglow on clear nights is confined to distant horizons, leaving the zenith pristine. If you enjoy structured observing, consider scheduling your trip to coincide with events at Kielder Observatory, then retreating to a nearby campsite afterwards to continue your own observations in peace. As always, remember that clear skies can be brutally cold in winter at these northern latitudes, so robust sleeping systems and layered clothing are crucial to staying comfortable through a long observing run.
Exmoor national park’s Gold-Tier dark sky status
Exmoor National Park in South West England was Europe’s first International Dark Sky Reserve, achieving recognition in 2011 for its exceptionally dark skies and proactive lighting policies. The park’s Gold‑Tier status indicates that natural darkness is preserved to an outstanding degree, particularly in central moorland areas away from coastal settlements. Campsites near Simonsbath, Withypool, and Brendon offer convenient bases for both daytime hikes and night‑time observations, often with open moorland just a short walk from your tent. Here, camping under the stars means expansive horizons, subtle airglow, and frequent views of the Milky Way arching low over the heather.
Because Exmoor sits further south than many other UK dark sky destinations, it offers slightly milder temperatures and longer observing seasons for comfortable astronomical camping. Summer evenings are perfect for wide‑field astrophotography of the galactic core over stone walls and tors, while crisp autumn nights bring excellent transparency for deep‑sky objects. Coastal humidity and low‑level mist can occasionally soften the view, particularly in valleys, so it is wise to choose pitches on gentle slopes or elevated fields when possible. With the right campsite selection, Exmoor provides a compelling balance of accessibility, scenery, and reliable dark sky quality.
Yorkshire dales dark sky discovery sites
The Yorkshire Dales National Park has embraced stargazing tourism through a network of Dark Sky Discovery Sites, recognised for their publicly accessible, relatively dark skies. Locations such as Malham, Buckden, Hawes, and Tan Hill Inn offer convenient parking, facilities, and open vistas ideal for both casual skywatchers and more serious astronomical campers. Many local campsites reduce unnecessary lighting and provide information on night sky events, particularly during the annual Dark Skies Festival held each February. On clear winter nights, the constellations of Orion, Taurus, and Gemini dominate the sky, while the Pleiades sparkle like a tiny open cluster of diamonds.
For those combining hiking and astronomy, the Dales’ rolling limestone landscapes provide numerous vantage points where you can escape even modest village lighting with a short walk from your tent. Dry‑stone walls, barns, and barns silhouetted against the Milky Way make superb foregrounds for nightscape photography. That said, the Dales are known for rapid weather changes and frequent cloud cover, so building flexibility into your itinerary is essential. Planning a multi‑night stay, monitoring satellite imagery, and being prepared to seize brief clear windows can make the difference between a frustrating trip and an unforgettable view of the cosmos.
Advanced weather pattern analysis for stellar visibility
Weather is the single most important variable you cannot control when camping under the stars, but you can significantly improve your odds of success by analysing patterns in advance. Clear skies alone are not sufficient; you also need stable atmospheric conditions, low humidity, and minimal high‑altitude haze for optimal stargazing. Modern tools such as the Met Office forecasts, satellite imagery, and specialised astronomy apps (for example, Clear Outside or Meteoblue’s astronomical seeing charts) provide detailed insight into cloud cover and transparency. By cross‑referencing these sources a few days before your trip, you can decide whether to adjust your destination, extend your stay, or shift your main observing night.
When examining forecasts, pay particular attention to three factors: total cloud cover, high‑cloud probability, and relative humidity at ground level. High cirrus clouds, barely visible to the naked eye at dusk, can dramatically reduce contrast for deep‑sky objects and astrophotography. Similarly, high humidity encourages dew formation on optics and can create low‑lying mist in valleys, obscuring the sky. If you see a pattern of clear, dry nights following a cold front, that often signals some of the best conditions for crisp, transparent skies. In contrast, slow‑moving warm fronts and stagnant high‑pressure systems can trap haze and pollution, reducing visibility even when the forecast technically shows “clear” conditions.
Campsite selection criteria for astronomical observations
Choosing the right campsite can be just as important as picking the right national park when your goal is serious stargazing. While many UK campsites advertise rural settings, their actual suitability for astronomy varies widely depending on lighting policies, horizon obstructions, and local microclimates. Before you book, it is worth asking: will nearby farm lights or village streetlamps intrude on your view, or will you be able to enjoy truly dark skies from your pitch? Evaluating a site through satellite imagery, online reviews from other stargazers, and direct contact with site owners helps you avoid common pitfalls and maximise your time under the stars.
An effective strategy is to create a simple checklist based on key astronomical criteria: Bortle scale rating, horizon clearance, elevation, and shelter from prevailing winds. You might find that a slightly more basic site with fewer facilities offers far superior night sky quality compared to a fully serviced holiday park. Weighing comfort against darkness is a personal decision, but being clear about your priorities from the outset makes it easier to choose a campsite that aligns with your stargazing goals. After all, what is the point of bringing high‑end telescopes and cameras if your southern view is blocked by a bright shower block or a line of tall conifers?
Light pollution measurement using bortle scale classifications
The Bortle scale provides a practical framework for assessing night sky quality, ranging from Class 1 (excellent dark sky) to Class 9 (inner city). For camping under the stars in the UK, most observers aim for Bortle Class 2–4 locations, where the Milky Way is visible and light pollution remains confined to low horizons. You can estimate a site’s Bortle class using online light pollution maps, such as those based on satellite data, and by reading reports from other amateur astronomers. While these tools are not perfect, they help you quickly distinguish between truly dark rural sites and more compromised peri‑urban locations.
On the ground, you can refine this assessment using smartphone apps that report sky brightness in magnitudes per square arcsecond, or by employing a dedicated Sky Quality Meter (SQM) if you own one. A reading of 21.5 mag/arcsec² or higher typically corresponds to excellent dark sky conditions for deep‑sky observing, while values below 20 indicate significant light pollution. When evaluating campsites, think of the Bortle scale like a noise level indicator for the sky: the lower the “noise” from artificial lights, the more subtle celestial details you will perceive. Even a one‑class improvement—for instance, from Bortle 4 to Bortle 3—can transform galaxies from faint smudges into clearly defined structures.
Terrain elevation and horizon obstruction assessment
Elevation and surrounding terrain strongly influence what you can see when you are camping in natural settings. Higher altitudes often offer thinner, less turbulent air and reduced ground‑level haze, improving both naked‑eye visibility and telescopic views. However, extreme elevation is not essential; even modest hills above valley fog can make a noticeable difference. What matters more for many observers is horizon obstruction: trees, buildings, and ridgelines that block low‑altitude targets like the galactic centre or rising planets. A site with a clear southern and eastern horizon is especially valuable during summer and autumn observing sessions.
Before your trip, you can use tools such as Google Earth, Ordnance Survey maps, or hill‑profile apps to visualise the terrain around your prospective campsite. Look for open fields or gentle slopes rather than deep valleys or sites tucked directly against mature woodland. Once on site, a quick daylight survey helps you identify potential observing spots a short walk from your tent if your pitch itself is partially obstructed. Think of the landscape as a natural amphitheatre for the sky: the more open the “stage” above you, the more celestial actors you will see appearing throughout the night.
Microclimate considerations for atmospheric stability
Even within the same dark sky region, microclimates can vary significantly across short distances due to local geography, water bodies, and vegetation. Valleys tend to collect cold air and moisture, increasing the likelihood of fog and frost, while nearby lakes can generate patches of mist that drift unpredictably across your observing field. Conversely, gently sloping hillsides and plateaus often enjoy better airflow and more stable conditions, reducing both dew formation and low‑level turbulence. When camping for astrophotography or detailed planetary observation, these subtle differences can strongly influence image sharpness and comfort.
To take advantage of favourable microclimates, consider camping slightly above valley floors and avoiding spots immediately adjacent to rivers or wetlands when clear skies are your priority. Pay attention to prevailing wind directions: a site on the leeward side of a hill may be less windy but more prone to pooling cold, moist air. Over time, you will develop an intuitive sense of which topographies produce steady, transparent skies and which tend to trap haze. This local knowledge, combined with broader weather analysis, allows you to choose not just the right park, but the right corner of that park for the best possible stargazing.
Astrophotography techniques in remote camping environments
Capturing high‑quality night sky images while camping adds another layer of challenge and satisfaction to your astronomical adventures. Without the controlled environment of a home observatory, you must adapt your workflow to field conditions, managing power, dew, and time efficiently. Fortunately, modern cameras and tracking mounts have made portable astrophotography remarkably accessible. Whether you are using a DSLR on a static tripod or a dedicated astro‑camera with a star tracker, a few key techniques will help you make the most of your precious clear nights.
For wide‑field Milky Way photography, a full‑frame camera with a fast lens (for example, 14–24mm at f/2.8 or faster) on a stable tripod is often sufficient. Use the so‑called “500 rule” (500 divided by focal length in millimetres) as a rough guide to maximum exposure time before stars start to trail—though many photographers now prefer the more conservative “300 rule” for sharper results. Shooting in RAW format at ISO 3200–6400 typically balances sensitivity and noise on modern sensors. Compose your scene to include foreground elements—tents, trees, or mountains—since these anchor the image and convey the sense of camping under the stars rather than producing a generic sky shot.
When using star trackers for longer exposures, accurate polar alignment is crucial. In the field, this often involves levelling your tripod, aligning the tracker’s polar scope with Polaris, and making fine adjustments using illuminated reticles or smartphone alignment aids. Once tracking, you can extend single exposures to several minutes at lower ISO settings, dramatically improving signal‑to‑noise ratio for faint nebulae and galaxies. To combat dew on lenses and telescope optics, pack USB‑powered dew heaters or hand‑warmers secured with elastic bands, and keep a soft microfibre cloth in a sealed bag as a backup. Power banks with sufficient capacity to run your mount, heaters, and camera all night are invaluable, so calculate your consumption in advance and bring redundancy.
Finally, consider your post‑processing workflow as part of your field strategy. Capturing multiple exposures for stacking, dark frames to calibrate sensor noise, and even short foreground exposures at blue hour all contribute to better final images. Yet time spent fiddling with settings in the cold is time not spent simply looking up and enjoying the sky. Strive for a balance: plan a shot list in advance, automate what you can, then step back and experience the moment with your own eyes while your camera quietly soaks up starlight.
Wildlife safety protocols during nocturnal stargazing sessions
Night‑time in wild places brings a different rhythm of activity, with many animals becoming more active just as astronomers and astrophotographers begin their sessions. Respecting local wildlife not only protects sensitive ecosystems but also enhances your own safety and enjoyment. In UK dark sky parks, you may encounter deer, badgers, foxes, owls, and bats, all of which rely on natural darkness and minimal disturbance. Keeping noise levels low, using red light sparingly, and sticking to established paths where possible helps you coexist peacefully with nocturnal residents.
Before your trip, familiarise yourself with any site‑specific guidance on wildlife, such as ground‑nesting bird protection zones or livestock grazing areas. If you are camping in upland regions with sheep or cattle, ensure your telescope tripods, guy lines, and camera gear are visible enough to prevent curious animals from tripping over them, while still minimising light pollution. Storing food securely in sealed containers and clearing away rubbish each night reduces the chance of attracting scavengers to your camp. Remember that to a fox or badger, leftover snacks can be an irresistible invitation, potentially altering their natural behaviour and creating long‑term problems for both animals and visitors.
From a personal safety standpoint, you should always let someone know where you will be observing, carry a fully charged phone, and keep a basic first‑aid kit accessible in your tent or backpack. When moving around in the dark, sweep the ground ahead with your red light to avoid uneven terrain, rabbit holes, or low branches. If you encounter wildlife at close range, give it space and time to move away rather than attempting to photograph it with flash or bright light. By adopting a mindset of quiet respect and awareness, you can enjoy hours of uninterrupted stargazing in truly wild settings, knowing you are treading lightly on both the land and its nocturnal inhabitants.